Run Protractor Against Internet Explorer VM

Step 1 - Get Virtualbox

Is free and available on many platforms

https://www.virtualbox.org/wiki/Downloads

Step 2 - Get a free Windows Virtual Machine

If you don’t have already a running Windows with IE you can quickly and legally go with this:

http://modern.ie/en-us/virtualization-tools#downloads
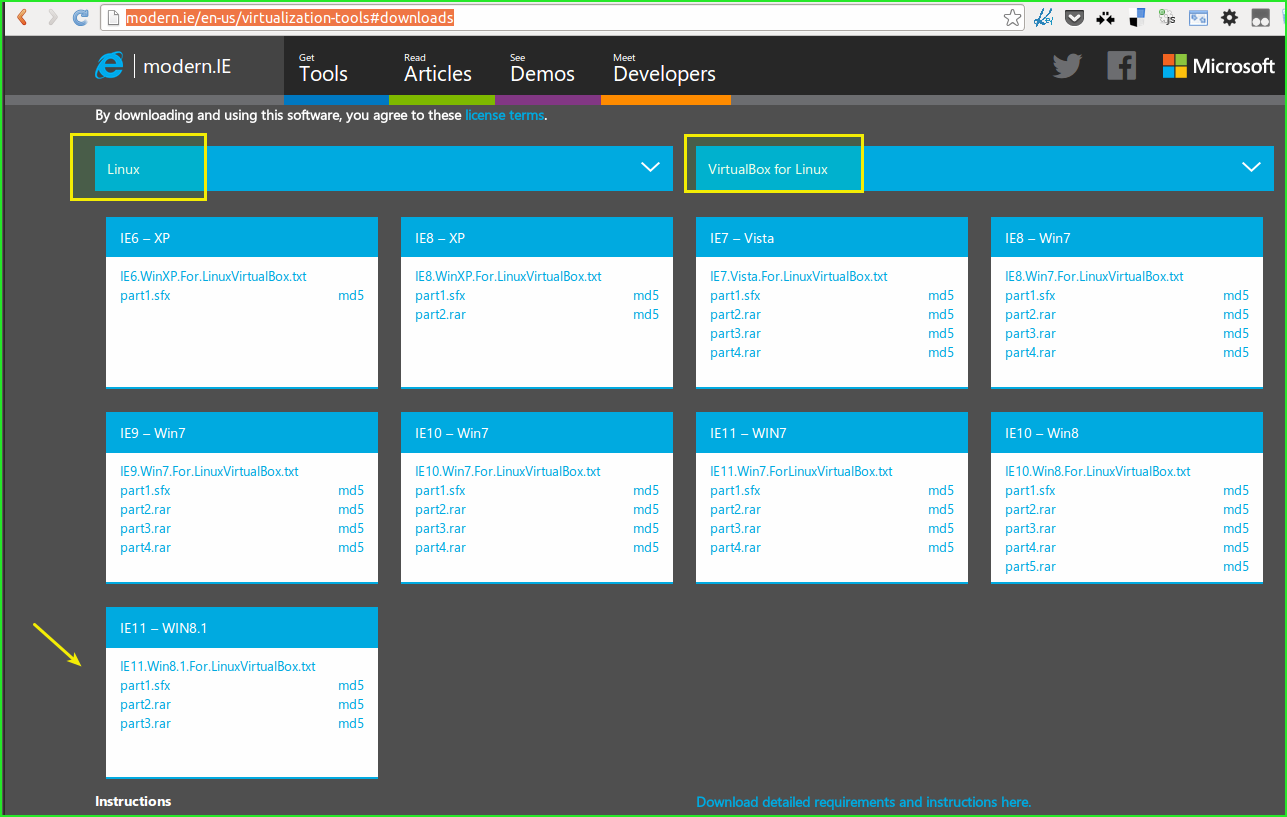
VirtualBox IE images

If, like me, you need to test against IE9, IE10, IE11 then you’ll need to download 2 VMs, one for each IE version, e.g.:

  • IE9 - Win7
  • IE10 - Win7 (yes you can use good old Windows 7 instead of Win8)
  • IE11 - Win7 (yes you can use good old Windows 7 instead of Win8.1)

Step 3 - Install Java on the windows VM

Once you have your Windows VM up and running, you should ensure java is installed. Install link here:

http://www.java.com/en/download/index.jsp

You may need to retry this download a few times since Windows security scan gives troubles sometimes.

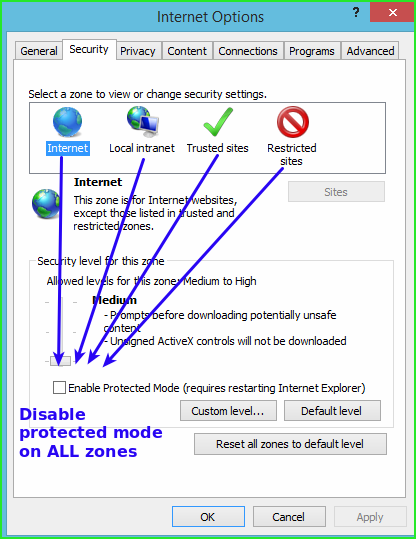
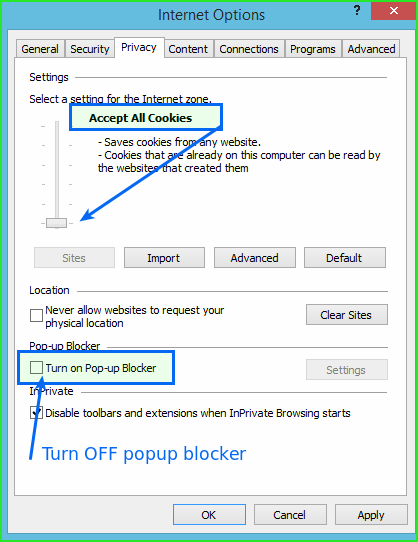
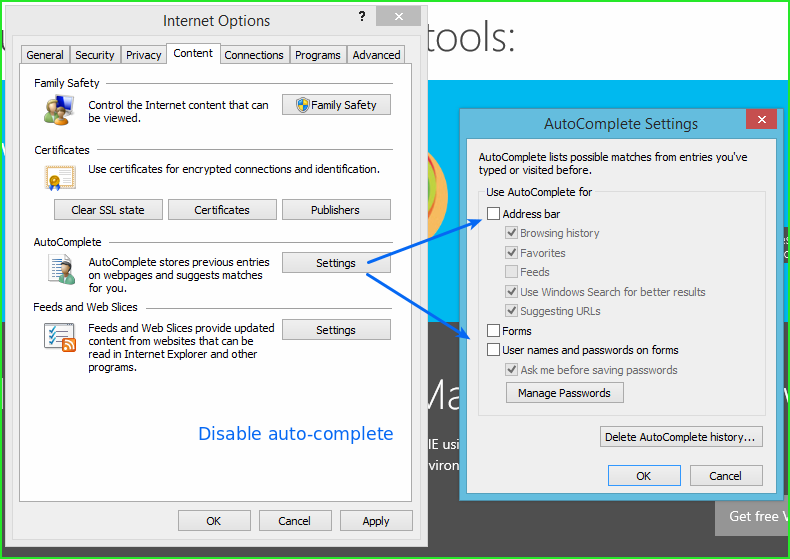
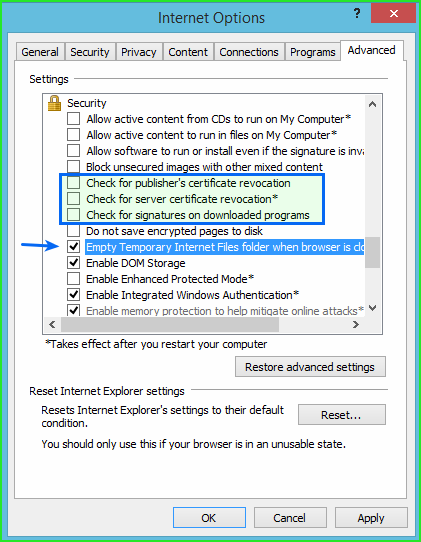
Step 4 - Disable protected mode on IE options among other things

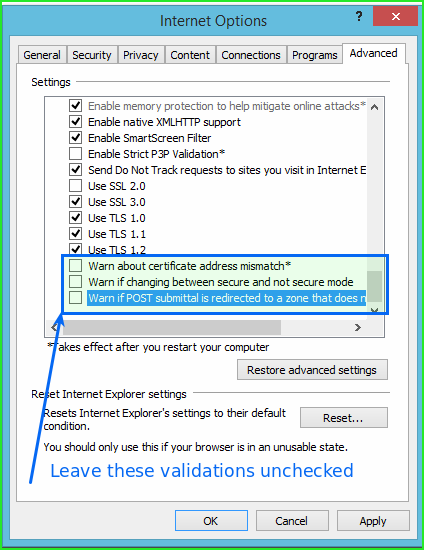
Go to Internet explorer options, follow these screen shots to get all setup:
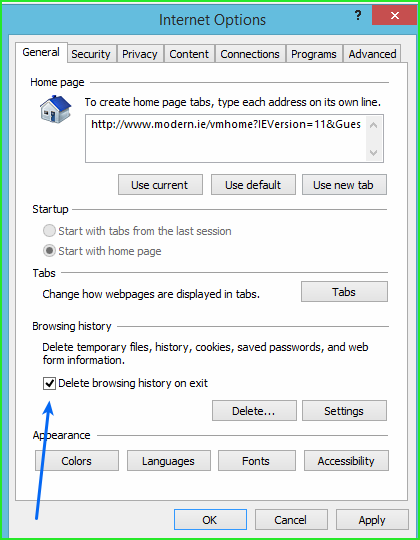
IE11_options1_delete_browsing_history_on_exit

IE11_options2_disable_protected_mode_all_zones

IE11_options3_turn_OFF_popup_bloquer

IE11_options4_disable_autocomplete

IE11_options5_dont_check_certificates_and_erase_temporary_files

IE11_options6_leave_warnings_unchecked

Following an IE10 / IE9 / IE8 necessary option:
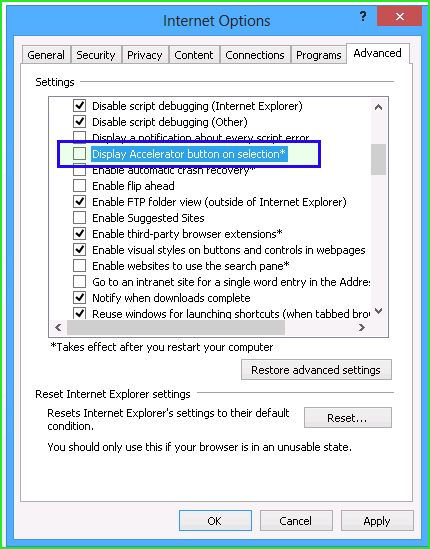
IE10_disable_accelerator_button_on_selection

Check “Install new versions automatically”
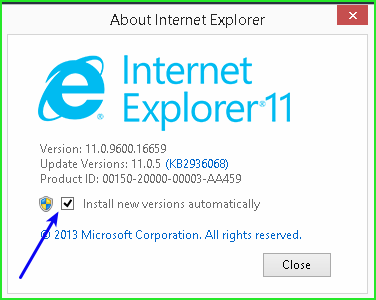
IE11_check_Install_new_versions_automatically

Step 5 - Download selenium standalone, latest

As of this writing, latest selenium is 2.44.0, search latest at:

http://selenium-release.storage.googleapis.com/index.html

Download these files in you windows VM:

http://selenium-release.storage.googleapis.com/2.44/selenium-server-standalone-2.44.0.jar

http://selenium-release.storage.googleapis.com/2.44/IEDriverServer_Win32_2.44.0.zip

We also need the IE driver, so by using 32 bits version and placing the extracted file into your windows path should get that ready. FYI people had issues with 64 bits versions of the driver so even on an 64 bits Windows machine I suggest you avoid using x64 driver, stick to 32 bits.

If your are unsure where to put the extracted file, copy IEDriverServer.exe to C:\Windows\System32

Step 6 - Run IEDriverServer.exe manually

Windows protected mode might be enabled, so run manually the file IEDriverServer.exe, but run it at the location path where you copied it, e.g. C:\Windows\System32

Running that file will trigger the Windows security pop up so you can authorize the executable with Run anyway to get that remembered by Windows:
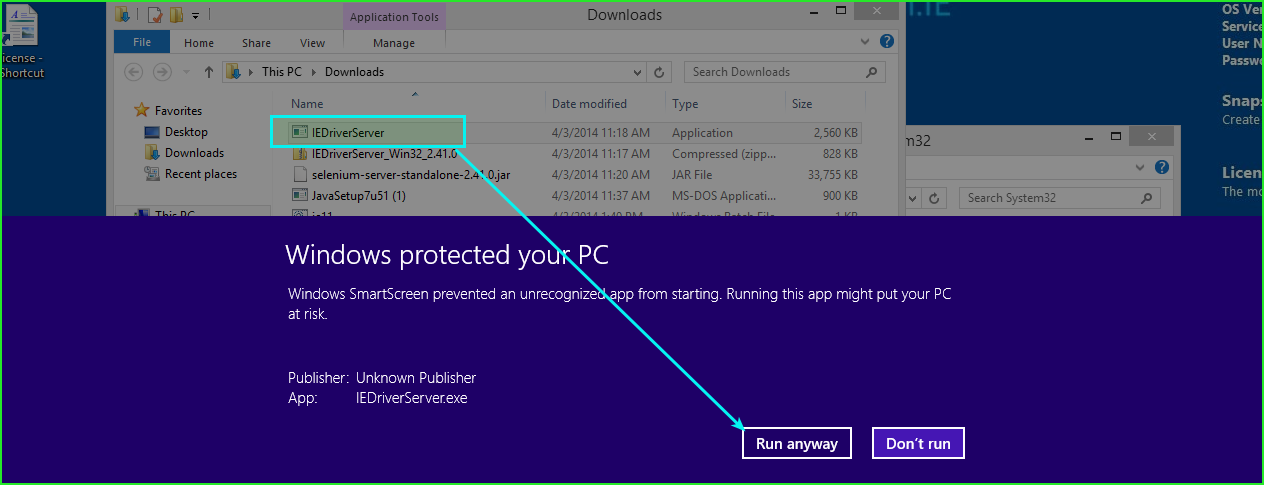
IEDriverServer_run_anyway_windows

Then Allow access for it. This is more related to Windows firewall actually:
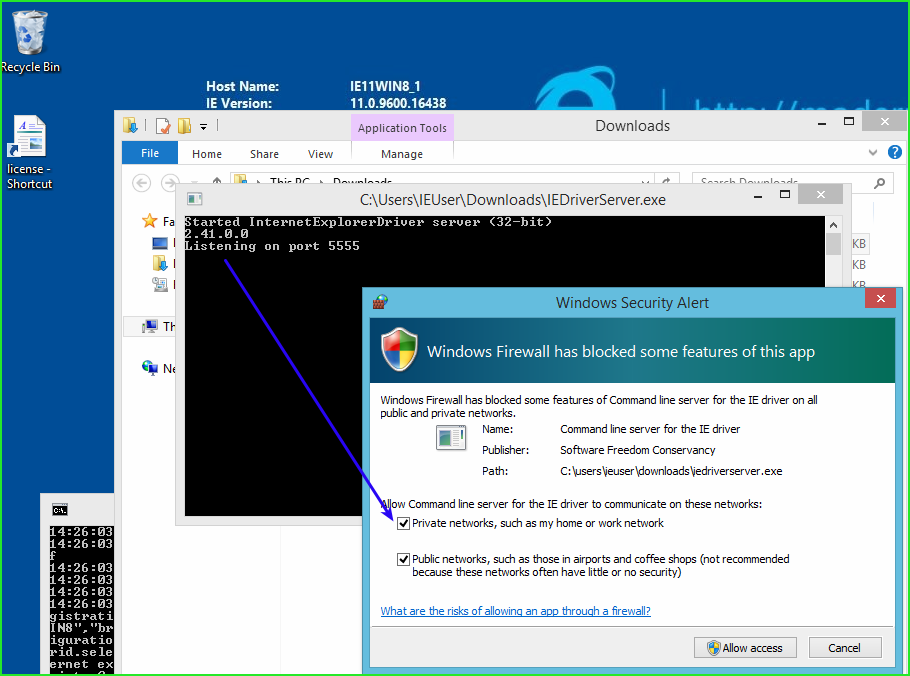
IEDriverServer_enable_firewall

IMPORTANT Close running IEDriverServer.exe now, this run was only to trigger Windows security and firewall dialogs.

Step 7 - Find out VM IP address

You can do so by opening the Windows command prompt cmd.exe then type ipconfig a common port number given by VirtualBox to the VM is 10.0.2.15 and VMWare might look more like 192.168.240.131 but it varies on each environment.

Take note of the IP address and within your host machine edit /etc/hosts file too add a new entry, I use custom domain names ie11.dev and so on like this:

1
2
192.168.240.131   ie11.dev
192.168.240.132   ie10.dev

So within your Protractor project you will need a config file that points selenium to the proper URL, e.g. a file ie11.conf.js

1
2
3
config.capabilities.browserName = 'internet explorer';
config.capabilities.version = '11';
config.seleniumAddress = 'http://ie11.dev:4444/wd/hub';

Step 8 - Write a .bat script to start selenium

Within your Window VM, you should place this ie11.bat file in the same directory where you downloaded the selenium standalone jar, for example in your downloads folder.

1
2
3
@echo IE11 selenium machine
java -jar selenium-server-standalone-2.44.0.jar -port 4444
@pause

Step 9 - Run ie11.bat

Note port 4444 is the default selenium port, you can change it if needed. We need Windows firewall to add a rule to allow incoming connections to that port; accept all when the Firewall screen appears after running ie11.bat
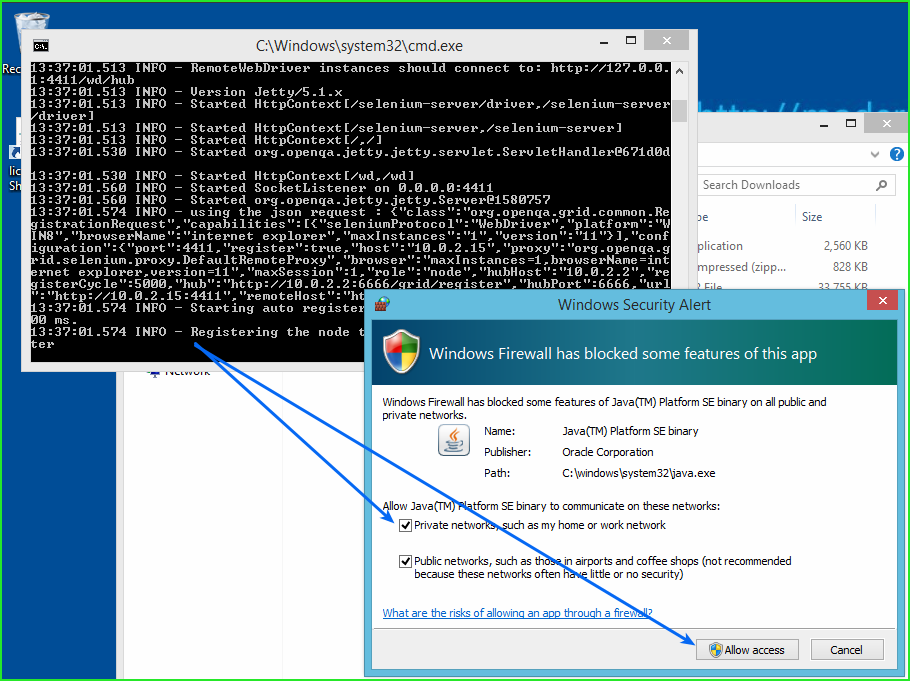
Windows_firewall_for_java

IMPORTANT Leave this script running on Windows machine. When you restart the VM you’ll have to manually start ie11.bat again unless you add it to the startup program list.

Step 10 - Configure protractor to use IE11

We already saw this on step 7 but let’s look again with an alternative syntax:

1
2
3
4
5
6
7
8
exports.config = {
    seleniumAddress = 'http://ie11.dev:4444/wd/hub';
    capabilities: {
        'browserName': 'internet explorer',
        'platform': 'ANY',
        'version': '11'
    },
};

Final notes and extras

This isn’t the only way to run against IE machine, you could install nodejs there too and install protractor.

Also note, you can go a step further and setup a selenium standalone grid if you want to maintain a more complex infrastructure.

Steps to do that below.

Alternative 1 - Install nodejs on Windows

Setting up protractor on Windows is quite doable, download first:

http://nodejs.org/download/

And select Windows Installer of course. I recommend you choose 32 bits installers. Follow setup wizard.

Once installed, open a Command Prompt or CMD.EXE

Install protractor globally:

1
npm install -g protractor

Make protractor download selenium and IE Driver for you:

1
webdriver-manager update --ie

You can start selenium on a custom port if need by adding --seleniumPort=4444

1
webdriver-manager start

Alternative 2 - Use Selenium Grid2

Within the host machine, in my case Linux. Instead of running webdriver-manager start you can switch to a standalone grid, a.k.a “hub” by running this simple command:

1
java -jar selenium-server-standalone-2.44.0.jar -role hub -port 6666 -newSessionWaitTimeout 25000

Port 6666 is just an arbitrary one, you can stick with 4444 if you like but I prefer to state some difference.

Note you can get selenium standalone jar file with wget:

1
wget http://selenium-release.storage.googleapis.com/2.44/selenium-server-standalone-2.44.0.jar

Also, you may need to open that port 6666 on your firewall, I did it with ufw in Ubuntu 13:

1
sudo ufw allow 6666

So leave java -jar selenium-server-standalone command running in an open terminal, this is the selenium grid that nodes will connect to.

If you want to switch to a selenium grid, you will need to change ie11.bat file like below. Also note IP 10.0.2.2 is usually VirtualBox host machine IP address, VMWare IP might be 192.168.240.1 when using the NAT interface.

1
2
3
4
5
@echo IE11 selenium hub machine
set HUBURL="http://10.0.2.2:6666/grid/register"
set BROWSERCAPS="maxInstances=1,browserName=internet explorer,version=11"
java -jar selenium-server-standalone-2.44.0.jar -role node -hub %HUBURL% -port 4444 -maxSession 1 -browser %BROWSERCAPS%
@pause

Troubleshooting Grid2

Check the selenium grid logs, on your host machine (in my case Linux) to see if the output contains the following error or similar:

1
WARNING: Failed to check status of node: Connect to 10.0.2.15:4444 timed out

That’s the case when the firewall is blocking port 4444 on the guest VM.

If you can not work around it, considering moving your VM network setup from NAT to Bridged. Then you will have to find out the IP address of you host machine, in my case Linux, and replace 10.0.2.2 with that IP, e.g. 192.168.0.3

Networking setup details is are little beyond the scope of this post.

Goodbye

Hope this post helps you.

Have a good time writing e2e protractor tests ! :D

Add Achievement Badges to Your Gem README

I really enjoy crashing into a gem with a markdown-ready README file that includes top badges telling me things like the current available gem version, the fact that is continuously being tested using travis or knowing the developer cares about the gem dependencies being up-to-date!

Take a look how this looks like in thor or some tiny gem of mine.

Achieving all that will take some steps, here is how:

How the badges will look like

Gem Version Build Status Dependency Status Code Climate Coverage Status

Where to sign-up

Getting your code ready to use them

Gem version, code climate and gem dependencies do not require more work on your side besides pushing your updates to github, those services will take care of the rest.

Travis-CI

Add this .travis.yml file to your project root, change it depending on the ruby versions you are interested to support:

1
2
3
4
5
language: ruby
rvm:
  - 1.9.3
  - 2.0.0
  - jruby-1.7.9

Coveralls with SimpleCov

I use SimpleCov for test coverage, coveralls gem take care of your badge,

Add necessary dependencies to your gemspec:

1
2
s.add_development_dependency "simplecov", ">= 0.8.2"
s.add_development_dependency 'coveralls', '>= 0.7.0'

If you use rspec, update your spec_helper.rb and add this lines to the very beginning:

1
2
3
4
5
6
7
8
require 'simplecov'
require 'coveralls'

SimpleCov.formatter = SimpleCov::Formatter::MultiFormatter[
  SimpleCov::Formatter::HTMLFormatter,
  Coveralls::SimpleCov::Formatter
]
SimpleCov.start

Update your README file

Replace strings elgalu with your github user and boolean_class with your github repo name. It’s probably a better idea that you use a templating tool for this like the one I built and use

# TODO: Your gem name

[![Gem Version][GV img]][Gem Version]
[![Build Status][BS img]][Build Status]
[![Dependency Status][DS img]][Dependency Status]
[![Code Climate][CC img]][Code Climate]
[![Coverage Status][CS img]][Coverage Status]

## Description

TODO: Your gem description

[Gem Version]: https://rubygems.org/gems/boolean_class
[Build Status]: https://travis-ci.org/elgalu/boolean_class
[travis pull requests]: https://travis-ci.org/elgalu/boolean_class/pull_requests
[Dependency Status]: https://gemnasium.com/elgalu/boolean_class
[Code Climate]: https://codeclimate.com/github/elgalu/boolean_class
[Coverage Status]: https://coveralls.io/r/elgalu/boolean_class

[GV img]: https://badge.fury.io/rb/boolean_class.png
[BS img]: https://travis-ci.org/elgalu/boolean_class.png
[DS img]: https://gemnasium.com/elgalu/boolean_class.png
[CC img]: https://codeclimate.com/github/elgalu/boolean_class.png
[CS img]: https://coveralls.io/repos/elgalu/boolean_class/badge.png?branch=master

Don’t forget to let me know if i’m missing new cool badges out there!

Google Analytics

I’ve recently added githalytics service in order to have Google Analytics for each of my github repos. Note there is also bitdeli service but haven’t tested it yet, let me know if is better or more free.

To do so:

  1. Go to Google Analytics website and signup to get your Property ID, e.g.

     Default URL protocol: https://
     Default URL source..: github.com/elgalu/time_ago_in_words
    

    You may also delete github.com from your GA Referral Exclusion List

  2. Go to githalytics and sign up, e.g.

     TrackingCode[url]:  https://github.com/elgalu/time_ago_in_words
     TrackingCode[code]: UA-12345-12
    
  3. Add the fake image badge that will send data for analytics purposes, e.g.

     [![githalytics.com alpha](https://cruel-carlota.pagodabox.com/3fe2425a26ab0ca00b5bc6acf817af59 "githalytics.com")](http://githalytics.com/elgalu/time_ago_in_words)
    

That should be it. Remember to check later on Google Analytics site for the collected data, works like a charm!

JSONP for Dummies

If you read wikipedia definition:

JSONP or “JSON with padding” is a communication technique used in JavaScript. It provides a method to request data from a server in a different domain, something prohibited by typical web browsers because of the same origin policy.

But let’s dig it right away with an example. I will use J50Npi standalone javascript library for that.

Step by Step Beginner’s Sample

Say you want to client-side print the user’s Country IP using some external JSONP free service.

You can test that solution from your browser right now:

1. Open your Browser

2. Open a non javascript intensive page; e.g. Roberto’s blog

3. Open the console by pressing F12 or whatever key your browser use. You may need to select tab ‘Console’ (tested on Chrome and Internet Explorer 10)

4. Paste the below code (within the console)

1
2
3
4
5
6
7
8
9
10
11
12
13
14
// This line taken from J50Npi.min.js (within this repo)
var J50Npi={currentScript:null,getJSON:function(b,d,h){var g=b+(b.indexOf("?")+1?"&":"?");var c=document.getElementsByTagName("head")[0];var a=document.createElement("script");var f=[];var e="";this.success=h;d.callback="J50Npi.success";for(e in d){f.push(e+"="+encodeURIComponent(d[e]))}g+=f.join("&");a.type="text/javascript";a.src=g;if(this.currentScript){c.removeChild(currentScript)}c.appendChild(a)},success:null};

// This is a WorldIP free geo-location database.
var url = "http://api.wipmania.com/jsonp";

// No specific data need to be sent there
var data = {};

// We need a function callback to be executed after the response is received
var callback = function(geodata){ alert(geodata.address.country); };

// And here is the magic:
J50Npi.getJSON(url, data, callback);

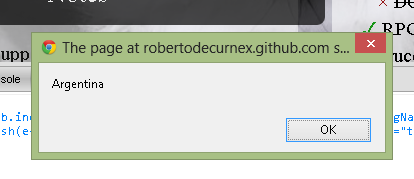
You should see an alert saying your current (ip based location) country name after half a second or so.

J50Npi IMG

Tools for Creating Your First Ruby Gem

This post is about tools you can use to turn your ruby idea into a ruby gem so you can share it with the ruby world. I will use a tiny gem of mine twitter_anonymous_client as a practical example and also use some power tools like yard that may be overkill for this tiny project but nice to know when working on bigger projects later on.

Gem Creation

You have a couple of options to start your gem files and directory structure, you can choose to write all of if from scratch, copy & paste from another gem source you liked, or use a bootstrap tool that does the work for you.

A popular option is using bundle gem GEMNAME to bootstrap your gem. I started with bundler but right after the third gem i got tired of being fixed to a template not so easy to customize without sticking my nose around bundler source.

So i partially extracted that into a gem called gem-newgem and turned it into a RubyGems plugin which is what i will use in this post.

Bootstrap your gem

1
2
3
4
5
6
7
8
9
10
11
12
13
14
15
16
17
18
19
20
21
22
23
24
25
26
27
28
29
$ gem install gem-newgem
Successfully installed gem-newgem-0.1.1

$ gem new twitter_anonymous_client --summary 'Twitter public (anonymous) client for old v1.0 API'
      create  twitter_anonymous_client
      create  twitter_anonymous_client/twitter_anonymous_client.gemspec
      create  twitter_anonymous_client/.gitignore
      create  twitter_anonymous_client/.rspec
      create  twitter_anonymous_client/.travis.yml
      create  twitter_anonymous_client/CHANGELOG.md
      create  twitter_anonymous_client/Gemfile
      create  twitter_anonymous_client/LICENSE.md
      create  twitter_anonymous_client/README.md
      create  twitter_anonymous_client/Rakefile
      create  twitter_anonymous_client/lib/twitter_anonymous_client.rb
      create  twitter_anonymous_client/lib/twitter_anonymous_client/version.rb
      create  twitter_anonymous_client/spec/twitter_anonymous_client_spec.rb
      create  twitter_anonymous_client/spec/spec_helper.rb
INFO: Initializing git repo at twitter_anonymous_client/
  git init
Initialized empty Git repository in ~/twitter_anonymous_client/.git/
  git add .
INFO: Will add remote so you get ready to push to github
  git remote add github git@github.com:elgalu/twitter_anonymous_client.git
INFO: Make branch tracking automatic
  git config --add branch.master.remote github
  git config --add branch.master.merge refs/heads/master

$ cd twitter_anonymous_client

If you take a look at the files you will see how your ~/.gitconfig information is used, the gem name you provided and the summary are used even in the README.md file.

This is how my .gemspec was generated, you’ll soon find out this is opinionated stuff, feel free to modify the template found at ~/.newgem-templates to get the requirements you need:

.gemspec
1
2
3
4
5
6
7
8
9
10
11
12
13
14
15
16
17
18
19
20
21
22
23
24
25
26
27
28
29
30
require 'twitter_anonymous_client/version'
Gem::Specification.new do |spec|
  spec.platform      = Gem::Platform::RUBY
  spec.name          = "twitter_anonymous_client"
  spec.version       = TwitterAnonymousClient::VERSION
  spec.summary       = %q{Twitter public (anonymous) client for old v1.0 API}
  spec.description   = spec.summary

  spec.required_ruby_version     = '>= 1.9.2'
  spec.required_rubygems_version = '>= 1.8'

  spec.license       = 'MIT'

  spec.authors       = ["Leo Gallucci"]
  spec.email         = ["elgalu3@gmail.com"]
  spec.homepage      = "https://github.com/elgalu/twitter_anonymous_client"

  spec.executables   = spec.files.grep(%r{^bin/}).map{ |f| File.basename(f) }
  spec.files         = `git ls-files`.split($/)
  spec.test_files    = spec.files.grep(%r{^(test|spec|features)/})
  spec.require_paths = ["lib"]

  spec.add_development_dependency "bundler", ">= 1.2"
  spec.add_development_dependency "rake"
  spec.add_development_dependency "rspec", "~> 2.13"
  spec.add_development_dependency "redcarpet", ">= 2.2"
  spec.add_development_dependency "yard", ">= 0.8"
  spec.add_development_dependency "simplecov", ">= 0.7.1"
  spec.add_development_dependency 'coveralls', '>= 0.5.8'
end

I will just add one runtime dependency there:

Add to .gemspec
1
  spec.add_runtime_dependency "strongly_typed"

By looking at the README.md file, you’ll see how much i like putting badges at the top of the doc. You will need to sign-up to those services to get your gem up and running, i wrote another post on how to do it.

Spec first, code later

First and foremost, check everything is working with bundler and rspec:

1
2
3
4
5
6
7
8
9
10
11
12
13
14
15
16
17
18
19
20
21
22
23
24
25
26
# Why not, use the latest available ruby version (as of this writing)
$ ruby -v
ruby 2.0.0p0 (2013-02-24 revision 39474) [x86_64-linux]

# Get your Gemfile.lock ready
$ bundle install
Using ...
Installing ...
Using twitter_anonymous_client (0.0.1) from source ...

# Let's see if some rake tasks are already available
$ bundle exec rake -T
rake build    # Build twitter_anonymous_client-0.0.1.gem into the pkg directory.
rake install  # Build and install twitter_anonymous_client-0.0.1.gem into system gems.
rake release  # Create tag v0.0.1 and build and push twitter_anonymous_client-0.0.1.gem to Rubygems
rake spec     # Run RSpec code examples

# Check the default task is to run the spec's
$ bundle exec rake
...
TwitterAnonymousClient
  should have a version number

Finished in 0.00537 seconds
1 example, 0 failures
...

Everything nice so far!

Now is time to write about what we expect from this gem:

Create a spec file like spec/user_timeline_spec.rb

spec/user_timeline_spec.rb
1
2
3
4
5
6
7
8
9
10
11
12
13
14
15
16
17
18
19
20
21
22
require 'spec_helper'

describe Twitter::Client do
  let(:screen_name) { 'elgalu' }
  let(:client) { Twitter::Client.new }
  let(:tweets) { client.user_timeline(screen_name, count: 1) }
  let(:first_tweet) { tweets.first }

  describe '#user_timeline' do
    context 'first tweet' do
      it 'should be a Tweet' do
        first_tweet.should be_a(Twitter::Tweet)
      end

      it 'should respond to id, text, created_at' do
        first_tweet.should respond_to(:id)
        first_tweet.should respond_to(:text)
        first_tweet.should respond_to(:created_at)
      end
    end
  end
end

Let’s leave out web mocking for now and expect those specs to run against real twitter servers.

Run $ bundle exec rake spec and watch it fail.

Code to make the specs pass

Good luck with that! …. or … take a look at twitter_anonymous_client source code.

Add documentation using yard

Yard is really nice producing beauty documentation files, all you need to do is remember a few keywords:

Yard Doc Examplelink
1
2
3
4
5
6
7
8
9
10
11
# Get some user timeline by screen name (last statuses)
#
# @param [String] screen_name the twitter user slug
# @param [Hash] opts the options to retrieve the statuses
# @option opts [Integer] :count The number of statuses to retrieve
#
# @example
#   Twitter::Client.new.user_timeline('DolarBlue', count: 1)
#   #=> [#<Twitter::Tweet:0x011.. @id="308609..., @text="Dolar Paralelo: $7,84.....
def user_timeline(screen_name, opts)
  .......

You should always check how your documentation looks like from time to time Run yard server! i will pass a different port cause i’m already using 8808 with something else:

1
2
3
4
5
6
7
8
9
$ bundle exec yard server --port 8828 --reload

[info]: No yardoc db found in .yardoc, parsing source before starting server...
Files:           2
...
Methods:         1 (    0 undocumented)
 33.33% documented
>> YARD 0.8.4.1 documentation server at http://0.0.0.0:8828
...

Open your browser at (http://localhost:8828) and find some of your type errors ;)

Publish your gem

Ensure you have your github username configured:

git config --global github.user your_user_name

Only the first time on the your gem:

curl -u your_user_name https://rubygems.org/api/v1/api_key.yaml > ~/.gem/credentials
### Enter host password for user 'your_user_name': ......

Every time you push a gem release

Follow these steps

1
2
3
4
5
6
7
8
9
10
11
12
13
14
15
16
17
18
19
20
21
22
23
24
25
26
27
28
29
30
31
32
33
34
# Commit your changes
git add ... && git commit ...

# Run specs on each ruby version you support to make sure everything works
rbenv shell 2.0.0-p0
bundle exec rake spec
rbenv shell 1.9.3-p392
bundle exec rake spec

# Separate commit to bump version
git add ... version.rb
git commit -m 'Bump version to 0.0.1'

# Tag your release
git tag -a v0.0.1 -m 'Version 0.0.1'

# Build your gem
gem build twitter_anonymous_client.gemspec

# Push to github
git remote add origin git@github.com:elgalu/twitter_anonymous_client.git

# Make tracking automatic
git config --add branch.master.remote origin
git config --add branch.master.merge refs/heads/master

# Push updates and tags
git push origin master
git push origin master --tags

# Push to rubygems
gem push twitter_anonymous_client-0.0.1.gem
#=> Pushing gem to https://rubygems.org...
#=> Successfully registered gem: twitter_anonymous_client (0.0.1)

Now tell ma you have your own ruby gem!

More info

If you need to go down into more details you can check:

Console Ruby Debug Is Easy

How many times have you thought that debugging is difficult so instead of finding out how to do it you simply started adding puts "var value: #{some_var}" all over your code and even external gems code!

Well i have news for you guys, ruby debug from your terminal is easy.

All you need to start is requiring 'debug' when calling your ruby script or ruby binary:

ruby -r debug your_program.rb

Below, take a look at how i debugged thor gem to add a new config option:

I executed some thor script with ruby -rdebug script.rb then:

1
2
3
4
5
6
7
8
9
# Set a breakpoint at directory.rb line 80:
break ~/.rbenv/versions/2.0.0-p0/lib/ruby/gems/2.0.0/gems/thor-0.17.0/lib/thor/actions/directory.rb:80
# Now run until program ends or hits a breakpoint
cont
# Take a look at the local variables after hitting that breakpoint:
local_variables
#=> [:file_source, :file_destination, :dirname, :destination, :lookup]
file_source
#=> "~/.newgem-templates/default/.git/description"

Play around in that console as you normally do with irb and..

have fun!!

How to Run Thor Tasks From Your Ruby Scripts

If you have a thor task defined in some file like i do:

Normally, you would invoke this thor task newgem from the command-line like this:

$ thor newgem some_name --test-framework rspec

But what if you need to do that from another ruby script?

Well, you can do so by passing the arguments directly, like this:

1
2
args = ["some_name", "--test-framework", "rspec"]
Newgem.start(args)

Using start is a way to go, but thor documentation suggest using invoke() instead, like this:

1
2
3
4
args = ["some_name"]
opts = {:test_framework => 'rspec'}
script = Newgem.new(args, opts)
script.invoke_all

Good look with your ruby scripting!

When to Use Ruby Inheritance Versus Mixins

In Ruby, I prefer to use inheritance to establish a subtype from an existing object; to say for example that a Car is a kind of Vehicle.

But to use mixins as a way to reuse code. Car and Aircraf, for example, are both kind of vehicles but a Car may include a Wheeled mechanism while an Aircraft an Air::Skied one:

Car and Aircraf both vehicles but Car includes a Wheeled mechanism while Aircraft an Air::Skied
1
2
3
4
5
6
7
8
9
class Vehicle; end

class Car < Vehicle
  include TransportationMechanism::Land::Wheeled
end

class Aircraft < Vehicle
  include TransportationMechanism::Air::Skied
end

Decisions regarding what is what deeply depends on your domain knowledge so you’ll end up with a subjective solution hopefully producing a code nice to read then easy to understand.